
Adobe Lightroom is by far the most widely used photo-editing and organization software on the market today! It is incredibly powerful and can be intimidating to new users (and continue to be daunting for even the most experienced user). Learning how to use this program from a professional instructor is definitely the best way to get started in Lightroom and will accelerate your abilities beyond what is possible with self learning. The tips below are by photo instructor and guide Dwight Vasel who will be teaching an in depth, two day Adobe Lightroom Workshop at the Wort Hotel in Jackson, Wyoming.
Learn to go SOLO!
What is SOLO and why would you want to use it? SOLO means only one window in the panel is open at a time. When you open one window, the other window closes automatically. This is useful when your workspace is limited, such as the screen size on a laptop or tablet. It’s my preferred method of working. If you tire of scrolling up and down your side panels in LR, here’s a great little tip. Go SOLO!
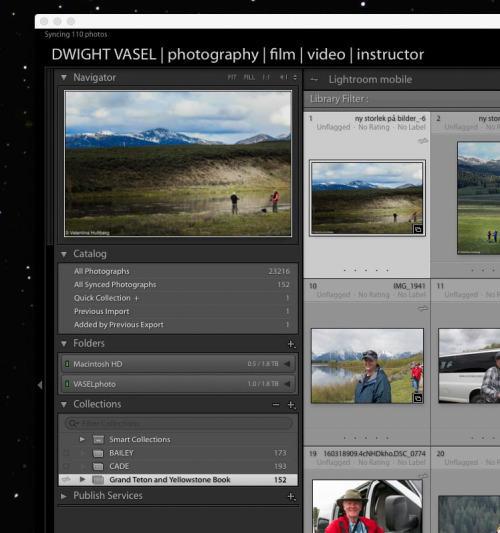
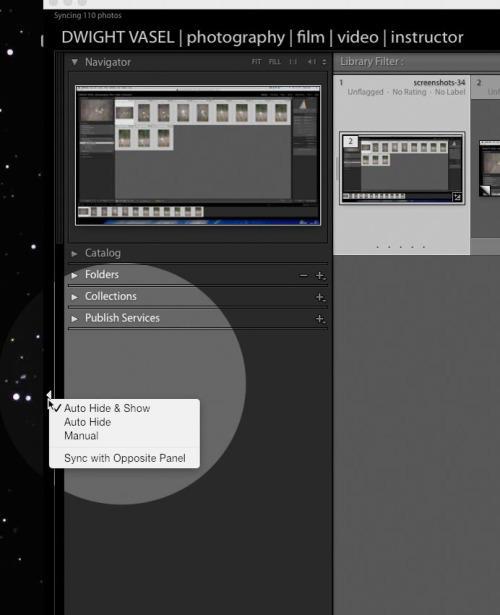
Your left side panel may look a lot like the image above. You can see that the CATALOG WINDOW is open, the FOLDERS WINDOW is open, the COLLECTIONS WINDOW is open and so on. This workflow can create quite a “list” of items to scroll up and down in order to find what you are looking for. If that is annoying, try the SOLO MODE.
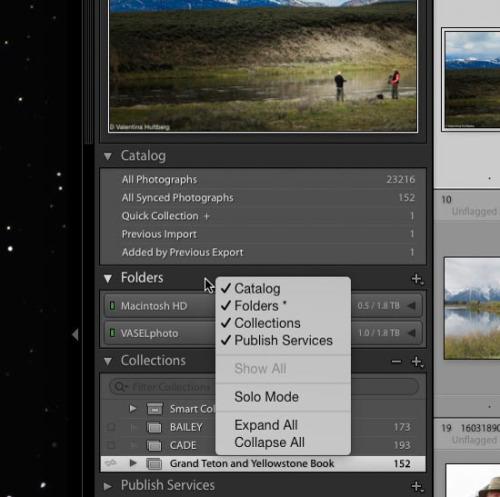
To find the SOLO MODE, look at the image above. Put your cursor next to one of the window names. In this case I chose FOLDERS. Right click next to the name and you will get a drop down menu. You can see SOLO MODE as a selection.
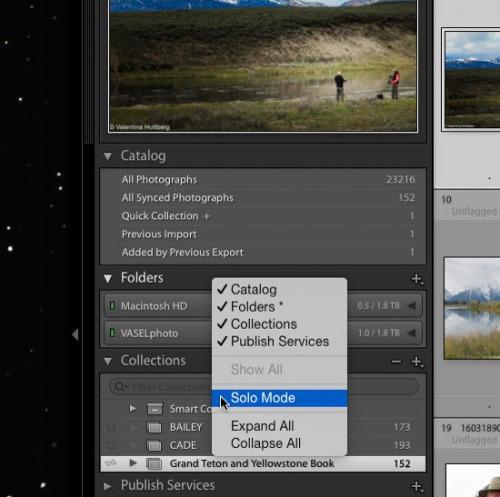
Go ahead and select SOLO MODE. In SOLO MODE only one window at a time will open in the panel. I enjoy this workflow. It saves me a lot of “scrolling time” to find the items I want to find. And I really like this workflow when working on my 13″ MacBook Pro and its small work space. Each side panel operates independently of the other. Which means that if you like the SOLO MODE on the left side panel, you will have to go to the right side panel and do the same thing. Also, each LR module is independent of the other. So if you did this procedure to the panels in the LIBRARY MODULE, when you go to the DEVELOP MODULE you will have to select SOLO MODE there too. Once they are set to SOLO MODE, they will stay set until you go back in and change it. A pretty easy process.
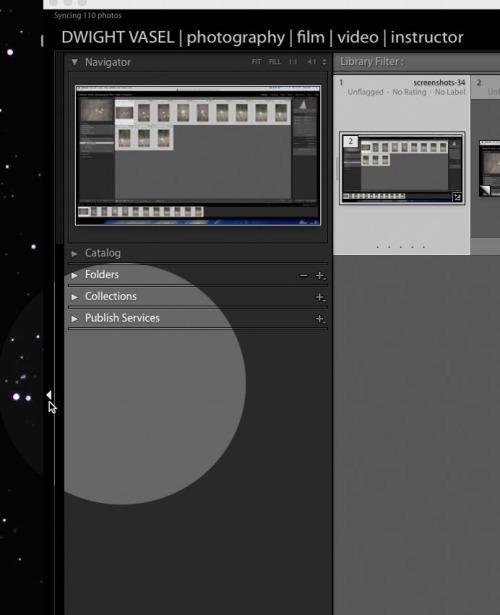
ONE LAST TIP: you see the names of the windows in this drop down menu. If you don’t use a window, just uncheck it. When unchecked, it will not show up in the panel. Another way to clean up your work area and eliminate items you do not use.
Get control of your side panels!
Frustrated with your LR side panels coming on screen and going off screen whenever they want? Or at least that’s what it seems like. You actually have several options available to you with your side panels. So let’s take a look.
About halfway down the left panel, on the edge of the screen, is a little triangle. Put your cursor over the triangle until it “lights up”. Once the triangle “lights up” then right click.
Now that you have right clicked on the triangle, a drop down menu should appear. These are the choices you have as to how your side panel will “behave”.
The LR default is AUTO HIDE & SHOW.
I prefer MANUAL. That puts me in control as to whether the panel is visible or not.
AUTO HIDE & SHOW: When your cursor goes over the triangle area of the panel the panel will automatically come on screen [if it’s not there] or go off screen.
AUTO HIDE: Your panel is on screen and you are working inside that panel. When your cursor leaves the panel, it automatically “hides” or goes off screen. In order to get the panel back on screen, you have to click on the panel’s triangle.
MANUAL: Just what it says. You manually go and click on the panel’s triangle to bring it on screen. The panel stays on screen until you manually go over and click on the panel’s triangle again to move it off screen or hide it.
SYNC WITH OPPOSITE PANEL: The panel on the opposite side of the screen will react the same as the one you are effecting. You bring one side panel on screen, the panel on the opposite side will come on screen too and vice versa.
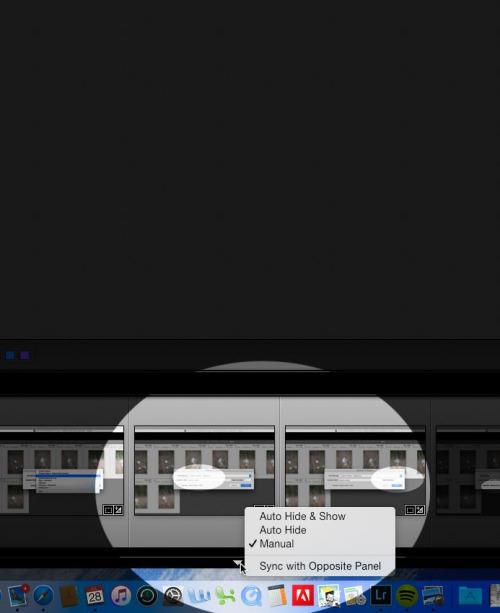
Each panel is independent of the other. You can have different “behaviors” for each side panel if you prefer. So make sure you click on each panel’s triangle to see if you have the preferred behavior chosen. Once again, I prefer MANUAL on all 4 panels.